
 10854
10854
- Using OneDrive in a Browser
- Installing OneDrive App on Windows
- See and Manage OneDrive Files
- Backup your Documents, Pictures and Desktop
- Sharing OneDrive Files and Folders
-
Sign in to Office 365 Outlook for Web.
-
Select the app launcher icon
 in the upper left, and then select OneDrive.
You can store over 300 types of files on OneDrive.
Using Microsoft Edge or Google Chrome:
-
Select Upload > Files or Upload > Folder.
-
Select the files or folder you want to upload.
-
Select Open or Select Folder.
-
To see how to share your files, click the 'Sharing OneDrive Files and Folders' link above
Installing OneDrive App for Windows
- If you're using Windows 10 (most Concord PCs are), your computer already has the OneDrive app installed - skip to step 2.
If you don't have Windows 10 or at least Office 2016, install the Windows version of the new OneDrive sync app here. - To open, select the Start button, search for “OneDrive”, and then click to open it:
- When OneDrive Setup starts, enter your Concord email address, and select Sign in.

There are two screens in the OneDrive Setup that are helpful to watch for:
- On the This is your OneDrive folder screen, select Next to accept the default folder location for your OneDrive files. If you want to change the folder location, select Change location - this is the best time to make this change. You don't usually need to change this location.

- On the All your files, ready and on-demand screen, you'll see how files are marked to show them as online-only, locally available, or always available.
Files On-Demand helps you access all your files in OneDrive without having to download all of them and use storage space on your Windows device.
Select Next.

back to top
See and manage your OneDrive files
You're all set. Your OneDrive files will appear in File Explorer in the OneDrive folder. You can quickly open your OneDrive folder by clicking the OneDrive icon ![]() in your taskbar and then OPEN FOLDER. This Icon (blue cloud) will also say UP TO DATE when all syncing has finished.
in your taskbar and then OPEN FOLDER. This Icon (blue cloud) will also say UP TO DATE when all syncing has finished.
If you use more than one account, your personal files appear under OneDrive – Personal and your work files appear under OneDrive – Concord University. Don't confuse them.
Any time you want to change the folders you sync on your computer, right-click that cloud icon in the taskbar notification area, and select Settings. You can find other information about your account and change other OneDrive settings from here too.

back to top
Back up your Documents, Pictures, and Desktop folders with OneDrive
You can back up your important folders (your Desktop, Documents, and Pictures folders) on your Windows PC with OneDrive PC folder backup, so they're protected and available on other devices.
Set up PC folder backup
-
If you're prompted to back up your important folders (Desktop, Documents, and Pictures), select the prompt to start the folder backup wizard.
If you didn't see the prompt or you already closed the wizard, right-click the cloud icon in the taskbar notification area, and select
Settings - Backup - Manage Backup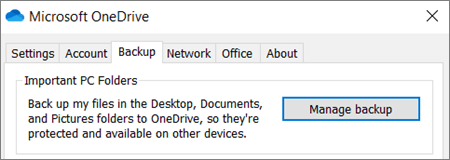
-
In the Back up your folders dialog, make sure the folders that you want to back up are selected.

-
Select Start backup.
When your files finish syncing to OneDrive, they're backed up and you can access them from anywhere in Documents, Desktop, or Pictures.
Sharing OneDrive Files and Folders
- To share files and folders open your OneDrive folder or open in Outlook for Web by right-clicking your OneDrive cloud icon and choosing VIEW ONLINE.
- In Outlook for Web pick the file or folder you want to share by selecting the circle to the left of its name, you can pick multiple items to share if needed.
- Click SHARE at the top of the page (or right-click within the app and choose
 )
)

- Select Anyone with the link can edit in the SEND LINK window to customize the link sharing options:

- Set the options and link settings you want on your link, then select Apply when you're done (see below for explanations):
- When ready, type in who to send the share invitation to along with a short message:

-
At the bottom of the Send link window, the Shared with list shows everyone who has access to the file. Each round item has either a photo of an individual or the initials of a group that the file has been shared with. If you want to edit the access level for an individual or group, select a photo or group initials to open the Manage Access page.
You won't see a Shared with list in this window if the selected file or folder isn't currently shared with someone. -
You can select COPY LINK to create a sharing link you can paste in an email or wherever else you're sharing a link.
Link Settings and explanations:
-
Anyone with the link gives access to anyone who receives this link, whether they receive it directly from you or forwarded from someone else. This may include people outside of Concord.
-
People in Concord University with the link gives anyone in your organization who has the link access to the file, whether they receive it directly from you or forwarded from someone else.
-
People with existing access can be used by people who already have access to the document or folder. It does not change the permissions on the item. Use this if you just want to send a link to somebody who already has access.
-
Specific people gives access only to the people you specify, although other people may already have access. If people forward the sharing invitation, only people who already have access to the item will be able to use the link. Note that in order to track access and ensure security, you can only share with someone who is in your organization or has a O365 Account.
-
Allow editing (check/uncheck) - When you share items with this type of link, people can edit files, and can add files in a shared folder if they're signed in with a O365 account. Recipients can forward the link, change the list of people sharing the files or folder, and change permissions for recipients. If you're sharing a folder, people with Edit permissions can copy, move, edit, rename, share, and delete anything in the folder.
Unchecking this box means that people can view, copy or download your items without signing in. They can also forward the link to other people. However, they cannot make changes to the version on your OneDrive.
-
Set expiration date - The link will only work until the date you set. After that, the link will be invalid, and you will need to create a new link for users requiring access to your file or folder.
-
Set password - When a user clicks the link, they will be prompted to enter a password before they can access the file. You'll need to provide this password separately to users.
Sharing with OneDrive Mobile Apps:
Share files in OneDrive for Android
Share files in OneDrive for iOS
For assistance with anything mentioned in the above KB, please contact the helpdesk at [email protected]

